How To Set Up and Fill Your First Beehive
So, you’re starting a new colony? This is an exciting time for new and experienced beekeepers alike. It’s a chance to learn more about how bee colonies live and work, help the environment and eventually, produce delicious natural honey for harvest.
To give your colony the best chance of survival, it’s important to choose the right gear, the right spot and tick all the set-up boxes.
Here’s how to get started:
Building your hive
You will need:
- A bottom board with entrance reducer
- A pest screen
- A feeder frame filled with sugar syrup
- Two brood chambers/boxes filled with frames
- Hive mat
- Roof
- Hive strapper – optional
Once you have all the equipment required for the building process, choose a dry, level area for the hive to be built on. Ideally, the hive entrance will face south, but be careful not to place it in the direction of any neighbours, footpaths or play areas. If it’s facing a hedge or fence, the bees will quickly learn to fly up and over.
Let’s get started.
- Place the bottom board on the ground and set the entrance reducer to the smallest size. You can make this bigger once the colony is established.
- Add a pest screen on top of the base if needed. These are great to check for Varroa mites and can be used to install treatments.
- Stack your first box, filled with frames, on top of the base. Remove some frames and replace them with your feeder frame, then fill that with cooled sugar syrup. This gives the bees a stable supply of food while they pour all their resources into drawing new comb.
- Put the second brood chamber filled with frames on top of the first one. This gives the colony room to expand.
- Set the hive mat on top of the second brood chamber. This provides insulation from extreme temperatures.
- Cover the whole structure with the roof and fasten with a hive strapper if the hive’s outside environment is windy or prone to severe weather.
- If you want to paint your hives, do this before your bees arrive.
Now you have successfully built a new hive, it’s time to introduce the new citizens to their home. This can take some time, so be patient and work carefully and gently with the bees.
Introducing the bees
You will need:
- Clean spray bottle
- Bellow smoker
- Protective suit and gloves
- Bee brush
- Hive tool
- Queen candy (made prior)
- Bee colony including queen
Populate your hive
- Fill your spray bottle with water, grab your brush and tools, get your smoker fired up, and jump into your protective suit and gloves.
- Remove the second brood chamber entirely and the three innermost frames from the first brood chamber, to give you more space to pour the bees in.
- Open your box or package of bees and spritz them with water to calm them and weigh them down, making them easier to manage.
- Direct a few puffs of smoke at the bees to disrupt their communication and help calm them further.
- If your bees came with a transportable feeder, remove this slowly.
- Remove the queen cage and brush off any bees that are on it. Check on her to make sure she is well, then set the cage aside.
- Pour your bees into the hive. You might need to give the box a hearty shake to get them out.
- If some bees remain in the transport box, place this facing the hive and they should all join the rest quickly.
- Once all the bees are on the frames in the brood chamber, carefully replace the three frames you removed earlier.
- Remove the plug from the queen cage and cover the hole with your finger so she can’t escape.
- Insert the queen candy you prepared earlier into the plughole.
- Place the queen cage screen-side down between the centre frames and make sure it’s secure. The bees will eat the queen candy over the next two or three days and free the queen.
- Replace the second brood chamber, hive mat, roof and hive strappers and leave the bees alone for eight days.
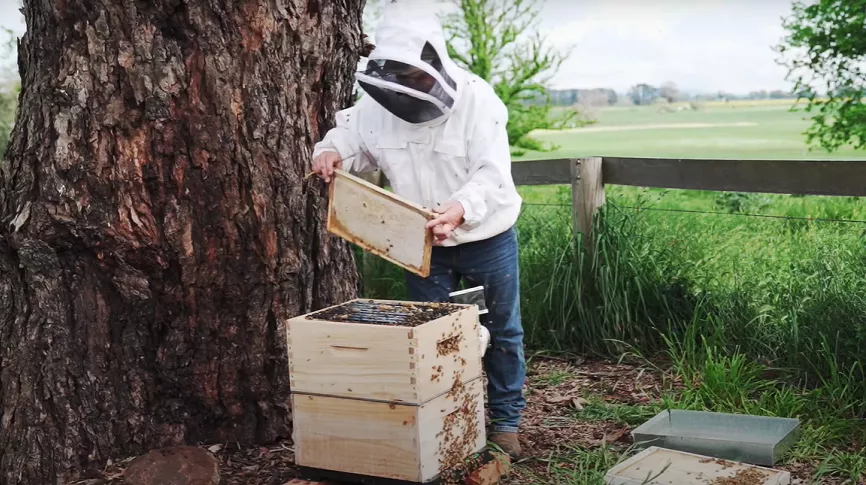
- On day eight, remove the hive strappers, roof and hive mat. Gently lift the outermost frame from the brood chamber and move all others a bit further apart. This lets you inspect the bees without hurting them.
- Lift out the middle frame and hold it up to the sun. You should see white dots a touch smaller than grains of rice. These are eggs – a great sign your queen is doing well and the colony is developing.
- Gently replace the two frames you have removed.
- Check on your bees regularly. Once they fill most of the two brood chambers, you can think about adding a queen excluder and honey supers so you can begin harvesting.
Patience is key to a strong colony
Hopefully, by now you know every step to building a safe and sturdy hive for your new bees. It will take some time for the colony to expand so you can start harvesting honey, but it will be well worth the wait.
Check out other articles, like A bee or not a bee? or Ecrotek | Choosing Beehive Frames – Wooden vs Plastic Frames, to help you on your beekeeping journey.